Prerequisites:
……….
I will divide whole process in following three parts:
- Getting different key’s from Twilio.
- Creating a server with node-js.
- Creating our main app with react-native.
Before starting, let’s first create react-native app.
Make one server folder.
So let’s start with the first part.
……….
1. Getting different key’s from Twilio:
Go to you Twilio console (click here to go to your console). We need to generate an API key and for that go to Settings > API keys. Then click on the plus icon.
 Now give any friendly name and then click on Create API Key button. After that you will get the API key and Secret key. Copy them as well as copy ACCOUNT_SID from console and paste them at some safe place. We need them to generate tokens from the server. Here we are done with the first part, now we will work on our backend server.
……….
2. Creating a server with node-js:
Now from root folder, copy and paste following commands in the terminal. It will download the required packages.
git init -y && yarn add express nodemon dotenv twilio ngrok
Now make following changes in package.json file.
Now make one new file and name it as .env which will contain all of our API keys. So copy and paste all of your Twilio API keys like below:
Next step is to make index.js file which will contain our logic to generate Twilio tokens for participants to join a room. We will first import all of our packages that we downloaded. After that we will config our .env file.
After that we are taking out AccessToken and VideoGrant form twilio package. AccessToken will be used for generating JWT token.

Then we are making one route that is /getToken, which accepts a get request and returns a JWT token. To generate a JWT token we need a username and if that is not provided then server will respond with status code 400 and an error message. After taking username from the query, we will provide all of our keys which are stored in .env file to AccessToken. And then we are providing username as identity to that AccessToken. After that we’ll convert that AccessToken to a JWT token and sending that back to the client.
Here’s the full code for index.js file.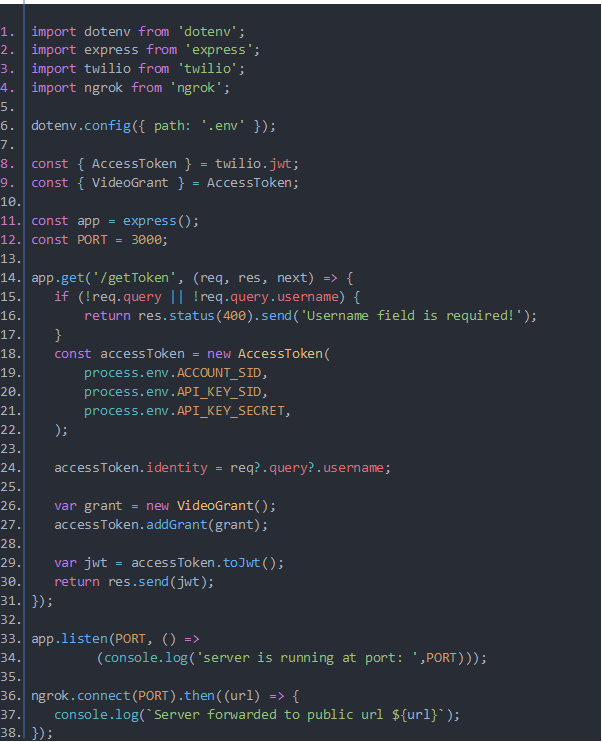
so here our part two is also completed! Now we will move to part 3.
……….
3. Creating our main app with react-native:
Come to your root folder in terminal and download following packages. You can copy and paste.
yarn add @react-navigation/native @react-navigation/stack react-native-reanimated react-native-gesture-handler react-native-screens react-native-safe-area-context @react-native-community/masked-view react-native-permissions react-native-twilio-video-webrtc axios react-native-vector-icons
Note* : Make sure to do react-native link react-native-vector-icons after downloading packages.
Now before we start coding, we need to do little setup in-order to Twilio to work in our app.
- Go to iOS > Podfile and change following:

- Add following permission dependencies in same Podfile.
pod 'Folly', :podspec => '../node_modules/react-native/third-party-podspecs/ Folly .pods pec'

// We add the following code

permissions_path = '../node_modules/react-native-permissions/ios' pod 'Permission-Camera', :path => "#{permissions_path}/Camera.podspec" pod 'Permission-Microphone', :path => "#{permissions_path}/Microphone.podspec" // End of added code

target 'reactNativeVideoCallTests' do
- Now we need to add following permission in iOS, for that go to
iOS > ${YOUR_PROJECT_NAME} > info.plist
- Next go to android > settings.gradle, add followings:
include ':react-native-twilio-video-webrtc'

project(':react-native-twilio-video-webrtc').projectDir = new File(rootProject.projectDir, '../node_modules/react-native-twilio-video-webrtc/android')
- Next go to android > build.gradle, increase the minimum supported Android version like in below image.

- On the
android > app > build.gradle, we tell gradle to implement this package:
- finally go to following path:
android > app > src > main > java > com > twiliointegration > MainApplication.java and import following package:
- And add following in the same file:

We are done with required setup, now we will start coding, so now overwrite App.js file with following:


Basically we are setting up navigation in our app. We have two pages one is home screen and second is video screen.
Next is Home screen: In this screen we will first get the permission of camera and mic from the user. Function getPermission is responsible for getting the required permission. Next we will have a function that sends a get request to our server. Server will return a JWT token.
Complete code for Home screen:


Next we will work on video call screen. Following is the code for video call screen.


So far we are done with the both the screens now we need to write code for permission handler. Following is the code for handling permissions:


Now we are done with the complete code. You can run you server and app and check you app.
Here’s the GitHub Repo for this project: mishivam/react-native-twilio-integration (github.com)


